
How to install and configure Drone CI on a self-hosted server
Drone CI is an open source continues integration and delivery platform built on container technlogoy. It is a lightweight and easy to use solution for testing and deploying your projects. Drone is distributed and run in a Docker container meaning it has no install dependencies at all (well, except for Docker itself) and it's very easy to set up and configure. In this guide we will install and configure Drone on a self-hosted server and then set up GitHub repositories to automatically test and build our projects.
In this guide we are using Ubuntu 18.04 and Drone version 1.0.0-rc.5.
Install Docker
First of all we need to install Docker.
We need to add the GPG for the Docker repository to ensure the downloads are valid.
curl -fsSL https://download.docker.com/linux/ubuntu/gpg | sudo apt-key add -Then we need to add the Docker repository to our Ubuntu APT sources because the original sources are not always up to date.
sudo add-apt-repository "deb [arch=amd64] https://download.docker.com/linux/ubuntu $(lsb_release -cs) stable"Then we install Docker Community Edition
sudo apt-get install -y docker-ceAdd our user to the Docker group
Only root and the docker group are allowed to run docker commands so to make our lives easier we can add our normal user to the docker group. That is done with a simple command.
sudo usermod -aG docker ${USER}After that you can logout and login again and then you should be able to see your user added to the docker group with this command:
id -nGInstall Docker Compose
Visit latest release page of Docker Compose to make sure you are downloading the latest version. Replace X.XX.X in the command below with the version, when writing this the latest version was 1.23.2.
sudo curl -L "https://github.com/docker/compose/releases/download/X.XX.X/docker-compose-$(uname -s)-$(uname -m)" -o /usr/local/bin/docker-composeMake sure it's executable.
sudo chmod +x /usr/local/bin/docker-composeIf everything went well you should be able to print the version.
docker-compose --versionAdd an application to your git service
You can use most git service with Drone but in this guide we will use GitHub.
Visit GitHub and go to Settings. Then navigate to Developer settings -> OAuth Apps and click Register a new application.
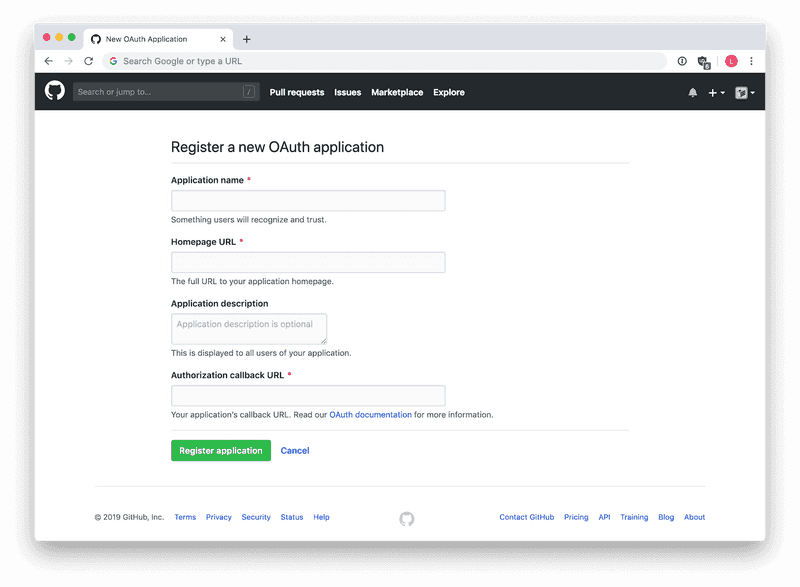
Fill out the form like this:
- Application name: Any name to identify the app, "Drone" will probably work fine.
- Homepage URL: The page pointing to Drone, for example
https://ci.example.com/. - Application description: Any descriptive text about your application and what it's for.
- Authorization callback URL: If using the same example as above, this should be
https://ci.example.com/login.
Click Register application and your app is created. You will also be able to see the credentials of your app, a Client ID as well as a Client Secret.
Install Drone
Because Drone is self-contained it doesn't have any dependencies, how great is that? We can pull the image right now to save some time but make sure to use the latest version. You can se all available versions here. Version 1.0.0-rc.5 is the latest in this example.
docker pull drone/drone:1.0.0-rc.5We then need a local place to store all our configurations, because they can't be stored in the container.
sudo mkdir /etc/droneThen we'll create a couple of files, first the docker-compose file used for starting Drone in its container.
sudo vim /etc/drone/docker-compose.ymlAnd then we add this. The file is YAML so make sure the indentation is correct.
version: '3'

services:
  drone:
    container_name: drone
    image: drone/drone:1.0.0-rc.5
    ports:
      - 127.0.0.1:8000:80
    volumes:
      - /var/run/docker.sock:/var/run/docker.sock
      - /var/lib/drone:/data
    restart: always
    env_file:
      - /etc/drone/server.env
Make sure you change the image line with the correct docker image version if you pulled a newer one. You can find out what version you've pulled with this command:
docker imagesThis makes it incredible easy to upgrade Drone in the future.
/var/lib/drone is the local destination where Drone saves its database.
Configure Drone environments
We referenced an environments file in our docker-compose file, let's create it.
sudo vim /etc/drone/server.envAnd then enter theses values:
# Service settings
DRONE_SERVER_HOST=ci.example.com
DRONE_SERVER_PROTO=https

# GitHub Settings
DRONE_GITHUB_CLIENT_ID=XXXXXXXXX
DRONE_GITHUB_CLIENT_SECRET=XXXXXXXXXXXX

# User setings
DRONE_USER_CREATE=username:xxxxx,machine:false,admin:true
DRONE_USER_FILTER=xxxxx- DRONE_SERVER_HOST: Where Nginx will point to our CI, in our example it's
ci.example.com. - DRONE_SERVER_PROTO: Set your server to use https.
- DRONE_GITHUB_CLIENT_ID & DRONE_GITHUB_CLIENT_SECRET: Because we are using GitHub we set these to the credentials we generated on our newly created GitHub application.
- DRONE_USER_CREATE: Create an admin account from the start.
- DRONE_USER_FILTER: Registration is limited to users included in this list, or users that are members of organizations included in this list. Necessary if only you should be able to access Drone on a public site.
Configure Drone systemd
Now we need to configure a systemd for managing the Drone service. We create a new service with
sudo vim /etc/systemd/system/drone.serviceThen we paste this into the file:
[Unit]
Description=Drone server
After=docker.service nginx.service

[Service]
Restart=always
ExecStart=/usr/local/bin/docker-compose -f /etc/drone/docker-compose.yml up
ExecStop=/usr/local/bin/docker-compose -f /etc/drone/docker-compose.yml stop

[Install]
WantedBy=multi-user.target
Summarized this tells Drone to start after Docker and Nginx and to restart the service if something fails.
Configure Nginx
Drone has a built in web server but because we (probably) are using an already installed one we can configure it to serve the Drone GUI. If you are hosting your web server on an other machine you can use the built in web server of Drone instead. You can read about setting up Nginx in my other blog posts.
You should also lock down your server so unauthorized persons can't access it but GitHub hooks should be able to.
Let's create and enable a new block in Nginx and then add this configuration. When adding Let's Encrypt you'll get the choice of both port 443 and 80 so not that important in this step.
upstream drone {
    server 127.0.0.1:8000;
}

map $http_upgrade $connection_upgrade {
    default upgrade;
    ''      close;
}

server {
    listen 443 ssl;

    root /var/www/ci.example.com/html;
    index index.html index.htm;

    server_name ci.example.com;

    location / {
        proxy_pass http://drone;

        include proxy_params;
        proxy_set_header Upgrade $http_upgrade;
        proxy_set_header Connection $connection_upgrade;

        proxy_redirect off;
        proxy_http_version 1.1;
        proxy_buffering off;
        chunked_transfer_encoding off;
        proxy_read_timeout 86400;
    }
}
Then add Let's Encrypt and enable the block. After you've applied the config for the new block and restarted the Nginx server we can start Drone.
sudo systemctl start droneTo see if everything works we can check the status.
sudo systemctl status droneIt should print out something like this:
● drone.service - Drone server
   Loaded: loaded (/etc/systemd/system/drone.service; enabled; vendor preset: enabled)
   Active: active (running) since Wed 2019-01-01 00:00:00 CET; 24h ago
 Main PID: 1258 (docker-compose)
    Tasks: 4 (limit: 2361)
   CGroup: /system.slice/drone.service
           ├─1258 /usr/local/bin/docker-compose -f /etc/drone/docker-compose.yml up
           └─1274 /usr/local/bin/docker-compose -f /etc/drone/docker-compose.yml up

Jan 01 00:00:00 server systemd[1]: Started Drone server.
Jan 01 00:00:00 server docker-compose[1258]: drone is up-to-date
[more logs...]
If it doesn't work we can see more of the logs with this command:
sudo journalctl -u droneAnd if it does work, awesome! Let's make Drone start everytime we boot.
sudo systemctl enable droneThat's it. You should now be able to connect to the server when browsing to https://ci.example.com/. You simply log in with your GitHub credentials. You can browse and enable pipelines for your repositories.
Configure Drone pipelines
All project configuration needed for Drone is saved in a .drone.yml file but we don't want to write our sensitive credentials directly in that file and make it visible for everyone in our repositories. Even if it's a private repo this is bad habit and you should avoid pushing sensitive data.
Drone has an excellent system for storing these secrets and making them accessible when running the build scripts.
Add secrets to Drone
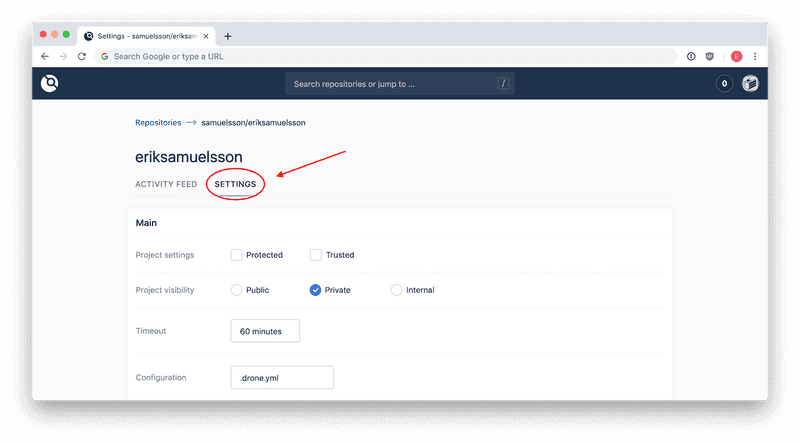
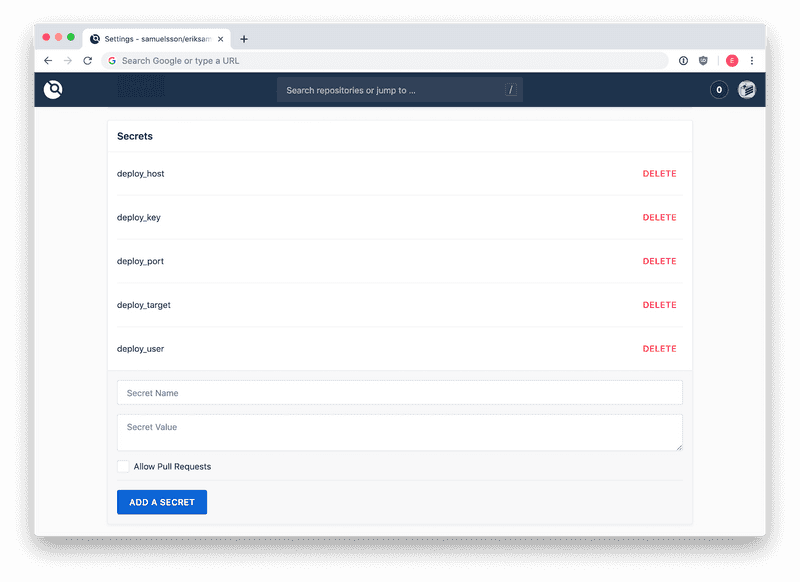
Navigate to your repository in Drone and go to settings. If you scroll down you'll find the secrets panel. We will be adding five secrets for our build.
The first four are quite simple, a name followed by the value. They are:
- deploy_host: The address to the web server which we will rsync to, without prepended protocol. For example
ci.example.com. - deploy_port: The port for rsync, this is usually
22, but if you've changed it you need to enter the correct one here. - deploy_user: The user we will be using when rsyncing to our deploy server. A separate user added to the system with limited permissions to the folder being deployed to is a good idea. This could be anything, like
deploy_user. - deploy_target: This is the path on the remote server where you want to deploy to. For example
/var/www/example.com/html/. Make sure your deploy user has write permissions.
The last one is the private key we will be using to connect to the server.
Add a private key to Drone secrets
First we need to generate a new key, you can place it somewhere temporary like in your home directory. Or you can add it the normal way to the deploy_user in the .ssh directory. You can read more about generating ssh keys here.
- deploy_key: Save the whole content of the private key to a new secret.
If you are using Drone CLI you can instead add the key with this command:
drone secret add \
   --repository username/reponame \
   --name deploy_key \
   --data @/path/to/id_rsa
You need read permissions to the key file and the @ at the beginning is not a typo ;) You can read more about installing and configuring Drone CLI here.
This is what it should look like afterwards:
Add the Drone configuration to the project
Now we need to create a .drone.yml file in the root of our git repository. This is the "recipe" used by Drone when running the build and deploy pipelines. It can do a lot but we will keep it simple with the basic stuff.
This is an example used for building and deploying this blog with Jekyll:
kind: pipeline      # What kind of script - usually pipeline
name: production    # A descriptive name if the whole pipeline
when:               # Only run the pipeline when it's a push to master
  event: [ push ]
  branch: [ master ]

# At the time of this writing there was an issue with latest commit not
# being pulled correctly. This fixes it but you may not need it.
clone:
  git:
    image: plugins/git
    pull: true

steps:              # Categorize each step
  - name: build     # Name of the categorized step
    image: ruby     # Use an image for each language used
    commands:       # Custom bash scripts used for building the project
      - gem install bundler
      - bundle install
      - export JEKYLL_ENV=production
      - bundle exec jekyll build

  # Deploy step using an Rsync plugin for updating files on remote server.
  # "settings" property is for plugin specific config
  - name: deploy
    image: drillster/drone-rsync
    settings:
      hosts:
        from_secret: deploy_host
      port:
        from_secret: deploy_port
      user:
        from_secret: deploy_user
      key:
        from_secret: deploy_key
      target:
        from_secret: deploy_target
      source: /drone/src/_site/*
      exclude:          # Optional to exclude some files or directories
        - "README.md"
      recursive: true   # Update files recursively on remote, needed if directories
      delete: true      # Remove remote files not present on client side
      script:           # Run optional remote scripts after rsync is completed
        - cd ~/scripts
        - sh run_my_script.sh
In the last deploy step we are using a plugin where most of the properties are loaded from our secretes. This makes the file safe to commit to our repository because it doesn't contain any sensible data. source: /drone/src/ is default path to where the script is running and placing built/compiled files. The following _site/ is a directory Jekyll creates when building (so that will probably differ for you) and the asterisk means all files in that directory.
The script property is optional and all scripts will run on the remote after rsync is completed.
That's it! Commit and push the file and GitHub will automatically communicate with your build server and it will start the pipeline. You can then add other steps, like writing a message in a Slack channel when the build passes or fails.